


이전에 Cocoa-Ruby 어플리케이션이란 포스팅에서 deepblue님께서 댓글로 MacRuby를 언급하셔서 존재한다는 것만 알고 있었습니다. 오늘 애플의 맥개발 센타에서
Developing Cocoa Applications Using MacRuby란 문서를 보았습니다.
대충 읽어보니 MacRuby는 루비로 Mac OS X 어플리케이션을 만들기 위한 애플의 오픈소스 프로젝트이며, 성능저하를 해결하고 완벽하게 통합시켰다고 합니다. 다운로드 받아서 간단하게 살펴 보았습니다.
1. 설치
http://www.macruby.org/files/에서 현재 최신버젼인 MacRuby 0.3.zip 파일을 다운로드 받습니다. 압축을 풀면 나오는 설치파일을 실행하면 간편하게 설치할 수 있습니다.
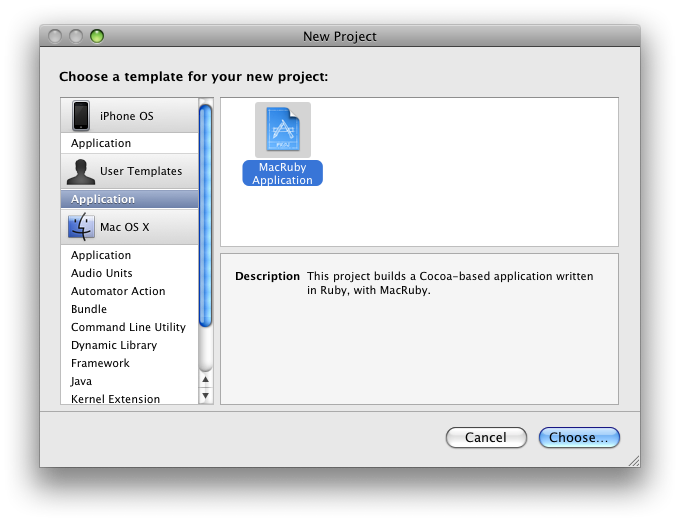
설치가 완료되면 Xcode를 실행하고 New Project... 메뉴를 클릭하면 아래와 같이 User Templates / Application에 MacRuby Application이 추가되어 있는 것을 확인할 수 있습니다.
2. 어플리케이션 작성
이전에 포스팅했던 Xcode3 첫 어플리케이션에 나오는 Objective-C로된 AppController를 MacRuby로 변경해 보겠습니다. 인터페이스 빌더에서의 작업은 완전히 동일하기 때문에 여기서는 소스코드만 살펴보겠습니다.
1) Objective-C
기존의 AppController의 Objective-C 소스는 아래와 같습니다.
* AppController.h
* AppController.m
2) MacRuby
MacRuby로 변경한 코드는 아래와 같습니다.
* AppController.rb
빌드하고 테스트를 해보면 Objective-C로 작성한 것과 완전히 동일하게 동작합니다. 문서를 보면 MacRuby는 실행시에 Objective-C 객체로 불러오고 Objective-C의 가비지콜렉터터를 사용한다고 합니다. 앞으로는 애플에서도 Cocoa-Ruby보다는 MacRuby에게 힘을 실어 주지 않을까 하는 생각이 듭니다. 또한 MacRuby는 기존 Ruby와는 별도로 macruby, macirb, macri macrdoc, macgem등 커멘드라인 유틸리티도 별도로 제공하고 있습니다.
자세한 자료와 튜토리얼등은 MacRuby 홈페이지에 잘 나와있습니다.
Developing Cocoa Applications Using MacRuby란 문서를 보았습니다.
대충 읽어보니 MacRuby는 루비로 Mac OS X 어플리케이션을 만들기 위한 애플의 오픈소스 프로젝트이며, 성능저하를 해결하고 완벽하게 통합시켰다고 합니다. 다운로드 받아서 간단하게 살펴 보았습니다.
1. 설치
http://www.macruby.org/files/에서 현재 최신버젼인 MacRuby 0.3.zip 파일을 다운로드 받습니다. 압축을 풀면 나오는 설치파일을 실행하면 간편하게 설치할 수 있습니다.
설치가 완료되면 Xcode를 실행하고 New Project... 메뉴를 클릭하면 아래와 같이 User Templates / Application에 MacRuby Application이 추가되어 있는 것을 확인할 수 있습니다.
2. 어플리케이션 작성
이전에 포스팅했던 Xcode3 첫 어플리케이션에 나오는 Objective-C로된 AppController를 MacRuby로 변경해 보겠습니다. 인터페이스 빌더에서의 작업은 완전히 동일하기 때문에 여기서는 소스코드만 살펴보겠습니다.
1) Objective-C
기존의 AppController의 Objective-C 소스는 아래와 같습니다.
* AppController.h
#import <Cocoa/Cocoa.h>
@interface AppController : NSObject {
IBOutlet NSTextField *textLabel;
IBOutlet NSTextField *inputField;
IBOutlet NSButton *refreshButton;
IBOutlet NSButton *leftButton;
IBOutlet NSButton *rightButton;
NSPoint originalPoint;
}
- (IBAction)setLabel:(id)sender;
- (IBAction)moveLeft:(id)sender;
- (IBAction)moveRight:(id)sender;
@end
* AppController.m
#import "AppController.h"
@implementation AppController
- (void)awakeFromNib {
NSImage *buttonImage = [NSImage imageNamed:NSImageNameRefreshTemplate];
[refreshButton setImage:buttonImage];
buttonImage = [NSImage imageNamed:NSImageNameGoLeftTemplate];
[leftButton setImage:buttonImage];
buttonImage = [NSImage imageNamed:NSImageNameGoRightTemplate];
[rightButton setImage:buttonImage];
originalPoint = [textLabel frame].origin;
}
- (IBAction)setLabel:(id)sender {
[textLabel setStringValue:[inputField stringValue]];
[textLabel sizeToFit];
}
- (IBAction)moveLeft:(id)sender {
[[textLabel animator] setFrameOrigin:originalPoint];
}
- (IBAction)moveRight:(id)sender {
CGFloat xPos;
xPos = [[[NSApp mainWindow] contentView] bounds].size.width;
xPos -= [textLabel frame].size.width;
NSPoint targetPoint = NSMakePoint(xPos, originalPoint.y);
[[textLabel animator] setFrameOrigin:targetPoint];
}
@end
2) MacRuby
MacRuby로 변경한 코드는 아래와 같습니다.
* AppController.rb
class AppController
attr_writer :textLabel, :inputField, :refreshButton, :leftButton, :rightButton
originalPoint = NSPoint.new(0, 0)
def awakeFromNib
@buttonImage = NSImage.imageNamed(NSImageNameRefreshTemplate)
@refreshButton.setImage(@buttonImage)
@buttonImage = NSImage.imageNamed(NSImageNameGoLeftTemplate)
@leftButton.setImage(@buttonImage)
@buttonImage = NSImage.imageNamed(NSImageNameGoRightTemplate)
@rightButton.setImage(@buttonImage)
@originalPoint = @textLabel.frame.origin
end
def setLabel(sender)
@textLabel.setStringValue(@inputField.stringValue)
@textLabel.sizeToFit
end
def moveLeft(sender)
@textLabel.animator.setFrameOrigin(@originalPoint)
end
def moveRight(sender)
@xPos = NSApp.mainWindow.contentView.bounds.size.width
@xPos -= @textLabel.frame.size.width
@targetPoint = NSPoint.new(@xPos, @originalPoint.y)
@textLabel.animator.setFrameOrigin(@targetPoint)
end
end
빌드하고 테스트를 해보면 Objective-C로 작성한 것과 완전히 동일하게 동작합니다. 문서를 보면 MacRuby는 실행시에 Objective-C 객체로 불러오고 Objective-C의 가비지콜렉터터를 사용한다고 합니다. 앞으로는 애플에서도 Cocoa-Ruby보다는 MacRuby에게 힘을 실어 주지 않을까 하는 생각이 듭니다. 또한 MacRuby는 기존 Ruby와는 별도로 macruby, macirb, macri macrdoc, macgem등 커멘드라인 유틸리티도 별도로 제공하고 있습니다.
자세한 자료와 튜토리얼등은 MacRuby 홈페이지에 잘 나와있습니다.
'Xcode 3' 카테고리의 다른 글
| Xcode 도움말 사용하기 (8) | 2008.12.11 |
|---|---|
| Cocoa-Ruby 어플리케이션 (6) | 2008.08.20 |
| Xcode 3 둘러보기(3) - 기타 (6) | 2008.08.14 |
| Xcode 3 둘러보기(2) - Interface Builder (14) | 2008.07.31 |
| Xcode 3 둘러보기(1) - Xcode (10) | 2008.07.29 |


